Real-Time Telemetry & Vouchers Last Updated:
NetcupDeals.com Logo
NetcupDeals.com
Cloud Benchmarks, Architecture & Verified Deals
PRODUCTION DEVOPS BLUEPRINTS • UBUNTU 24.04 / DEBIAN 12 / PROXMOX VE 8

Netcup DevOps & Self-Hosting Deployment Blueprints (Copy-Paste Configs)

Every Netcup server includes a routed /64 IPv6 subnet, custom ISO mounting via SCP, and self-service Reverse DNS. Use our battle-tested YAML and Bash blueprints below to deploy your stack in minutes.

← Back to Voucher & Server Finder Hub
DEVOPS & SELF-HOSTING BLUEPRINTS

Production Deployment Guides & Copy-Paste Configurations

Battle-tested configurations specifically tailored for Netcup KVM instances (Ubuntu 24.04 / Debian 12 / Proxmox VE 8), including routed /64 IPv6 Netplan, Coolify PaaS, Mailcow rDNS, and Kernel 6.8 TCP BBRv3.

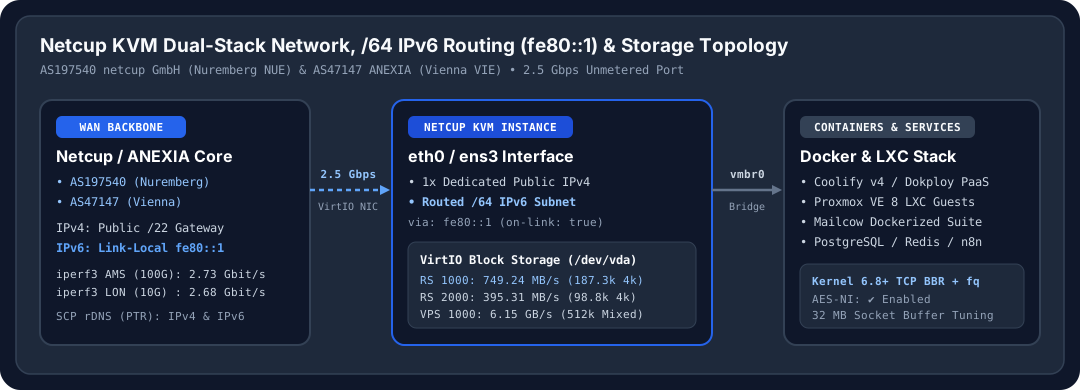
Netcup G12.5 KVM Dual-Stack IPv4 + Routed /64 IPv6 (fe80::1 Gateway) & Proxmox VE LXC / Docker Network Architecture Diagram
Architecture Diagram: How Netcup routes your dedicated /64 IPv6 prefix via link-local gateway fe80::1 alongside public IPv4 NAT for Docker and Proxmox LXC containers.
NETWORKING • UBUNTU 24.04 / DEBIAN 12

Configure Netcup's Routed /64 IPv6 Subnet via Link-Local Gateway (fe80::1)

Netcup assigns a dedicated /64 IPv6 prefix (18.4 quintillion addresses) to every RS and VPS instance. Unlike providers that use SLAAC, Netcup routes your /64 block statically through the link-local gateway fe80::1. Replace 2a0a:4cc0:xxxx:xxxx::1/64 below with the prefix shown in your SCP panel under 'Network'.

1 Log into SCP (servercontrolpanel.de) → Select your server → Open the 'Network' tab to copy your IPv4 address and /64 IPv6 subnet prefix.
2 Edit /etc/netplan/50-cloud-init.yaml (or /etc/network/interfaces on classic Debian) and set gateway6 / default route via fe80::1 with on-link: true.
3 Apply safely using 'sudo netplan try' and verify dual-stack routing with 'ping6 -c 4 2606:4700:4700::1111'.
Recommended Instance for This Blueprint:
RS 1000 G12.5 — Free for 2 Months
1. IPv6 /64 Netplan Config
# /etc/netplan/50-cloud-init.yaml (Netcup KVM Dual-Stack IPv4 + Routed /64 IPv6)
network:
  version: 2
  ethernets:
    eth0:
      match:
        macaddress: "xx:xx:xx:xx:xx:xx" # Keep your existing MAC address
      dhcp4: true
      dhcp6: false
      accept-ra: false
      addresses:
        - "2a0a:4cc0:0000:0000::1/64"   # Replace with your SCP /64 IPv6 address
        - "2a0a:4cc0:0000:0000::2/64"   # Optional: bind extra IPv6s from your /64
      nameservers:
        addresses:
          - 46.38.225.230               # Netcup Primary DNS
          - 46.38.252.230               # Netcup Secondary DNS
          - 2606:4700:4700::1111        # Cloudflare IPv6 DNS
      routes:
        - to: "::/0"
          via: "fe80::1"                # Netcup Link-Local IPv6 Gateway
          on-link: true

# Apply & test:
# sudo chmod 600 /etc/netplan/50-cloud-init.yaml
# sudo netplan apply
# ip -6 route show && ping6 -c 3 2606:4700:4700::1111

Complete Reference: All 5 Netcup Production Blueprints

NETWORKING • UBUNTU 24.04 / DEBIAN 12

Configure Netcup's Routed /64 IPv6 Subnet via Link-Local Gateway (fe80::1)

Netcup assigns a dedicated /64 IPv6 prefix (18.4 quintillion addresses) to every RS and VPS instance. Unlike providers that use SLAAC, Netcup routes your /64 block statically through the link-local gateway fe80::1. Replace 2a0a:4cc0:xxxx:xxxx::1/64 below with the prefix shown in your SCP panel under 'Network'.

1 Log into SCP (servercontrolpanel.de) → Select your server → Open the 'Network' tab to copy your IPv4 address and /64 IPv6 subnet prefix.
2 Edit /etc/netplan/50-cloud-init.yaml (or /etc/network/interfaces on classic Debian) and set gateway6 / default route via fe80::1 with on-link: true.
3 Apply safely using 'sudo netplan try' and verify dual-stack routing with 'ping6 -c 4 2606:4700:4700::1111'.
1. IPv6 /64 Netplan Config
# /etc/netplan/50-cloud-init.yaml (Netcup KVM Dual-Stack IPv4 + Routed /64 IPv6)
network:
  version: 2
  ethernets:
    eth0:
      match:
        macaddress: "xx:xx:xx:xx:xx:xx" # Keep your existing MAC address
      dhcp4: true
      dhcp6: false
      accept-ra: false
      addresses:
        - "2a0a:4cc0:0000:0000::1/64"   # Replace with your SCP /64 IPv6 address
        - "2a0a:4cc0:0000:0000::2/64"   # Optional: bind extra IPv6s from your /64
      nameservers:
        addresses:
          - 46.38.225.230               # Netcup Primary DNS
          - 46.38.252.230               # Netcup Secondary DNS
          - 2606:4700:4700::1111        # Cloudflare IPv6 DNS
      routes:
        - to: "::/0"
          via: "fe80::1"                # Netcup Link-Local IPv6 Gateway
          on-link: true

# Apply & test:
# sudo chmod 600 /etc/netplan/50-cloud-init.yaml
# sudo netplan apply
# ip -6 route show && ping6 -c 3 2606:4700:4700::1111
SELF-HOSTED PAAS • DOCKER & TRAEFIK

Turn Netcup RS 1000 G12.5 into a Self-Hosted Vercel / Heroku PaaS with Coolify v4

With an AMD EPYC 9645 96-Core Processor (4 Cores @ 2296.548 MHz), 8 GB DDR5 ECC RAM, and 128 GB NVMe (187.3k 4k IOPS), RS 1000 G12.5 can host 25+ production web apps, PostgreSQL/Redis databases, and automated GitHub deployment pipelines with zero per-seat SaaS fees.

1 Provision Ubuntu 24.04 LTS or Debian 12 Bookworm on RS 1000 G12.5 via SCP and configure UFW firewall to allow SSH (22), HTTP (80), HTTPS (443), and initial Coolify setup (8000).
2 Enable 4 GB NVMe swap and Docker log rotation so multi-stage Nixpacks/Docker builds never exhaust memory or disk.
3 Run the official Coolify v4 (or Dokploy) installation script and bind your wildcard domain (*.apps.yourdomain.com) in Traefik.
2. Coolify / Dokploy PaaS
#!/usr/bin/env bash
# Production Hardening + Coolify v4 Setup on Netcup RS 1000 / RS 2000 G12.5
set -euo pipefail

# 1. System updates & UFW firewall rules
apt-get update && apt-get upgrade -y
apt-get install -y curl wget git ufw fail2ban jq
ufw default deny incoming
ufw default allow outgoing
ufw allow 22/tcp
ufw allow 80/tcp
ufw allow 443/tcp
ufw allow 443/udp   # HTTP/3 QUIC
ufw allow 8000/tcp  # Initial Coolify dashboard (close after domain setup)
ufw --force enable

# 2. Configure Docker log limits before installing Coolify
mkdir -p /etc/docker
cat <<EOF > /etc/docker/daemon.json
{
  "log-driver": "json-file",
  "log-opts": {
    "max-size": "20m",
    "max-file": "3"
  }
}
EOF

# 3. Install Coolify v4 (or replace with: curl -sSL https://dokploy.com/install.sh | sh)
curl -fsSL https://cdn.coollabs.io/coolify/install.sh | bash
CONTAINERS • PROXMOX VE 8.X

Install Proxmox VE 8 on Netcup Root Server with NAT IPv4 + Routed /64 IPv6 Bridge

Because Netcup filters unknown MAC addresses on the physical switch port (and VM-x/AMD-V is disabled in standard KVM YABS runs), the cleanest Proxmox VE setup on Netcup uses LXC system containers with a routed vmbr0 configuration: containers share the host's IPv4 via NAT/masquerading while each LXC container gets its own public, routable IPv6 address from your /64 block.

1 In Netcup SCP → 'Media' → Mount the official Proxmox VE 8 ISO (or install Debian 12 Bookworm and add the Proxmox pve-no-subscription repository).
2 In SCP → 'Settings', ensure NIC model and storage driver are set to VirtIO for maximum I/O throughput (187.3k 4k IOPS / 4.34 GB/s 1m).
3 Configure /etc/network/interfaces on the Proxmox host as shown below to enable IPv4 NAT + native /64 IPv6 routing for all LXC containers.
3. Proxmox VE 8 & Routed LXC Bridge
# /etc/network/interfaces on Proxmox VE 8 Host (Netcup Root Server G12.5)
auto lo
iface lo inet loopback

auto ens3
iface ens3 inet static
    address <YOUR_PUBLIC_IPV4>/22
    gateway <YOUR_IPV4_GATEWAY>

iface ens3 inet6 static
    address 2a0a:4cc0:xxxx:xxxx::1/128
    gateway fe80::1

# Internal Bridge for KVM VMs & LXC Containers (10.10.10.0/24 + Public /64 IPv6)
auto vmbr0
iface vmbr0 inet static
    address 10.10.10.1/24
    bridge-ports none
    bridge-stp off
    bridge-fd 0
    post-up   echo 1 > /proc/sys/net/ipv4/ip_forward
    post-up   iptables -t nat -A POSTROUTING -s '10.10.10.0/24' -o ens3 -j MASQUERADE
    post-down iptables -t nat -D POSTROUTING -s '10.10.10.0/24' -o ens3 -j MASQUERADE

iface vmbr0 inet6 static
    address 2a0a:4cc0:xxxx:xxxx::2/64
    post-up   echo 1 > /proc/sys/net/ipv6/conf/all/forwarding
EMAIL DELIVERABILITY • SCP RDNS

Deploy Mailcow Dockerized with 10/10 Mail-Tester Score & Netcup SCP Reverse DNS

Gmail, Outlook, and Apple iCloud reject incoming emails if the sending server's IPv4 or IPv6 address lacks a matching Reverse DNS (PTR) record. Netcup's SCP panel allows instant self-service PTR updates for both your primary IPv4 and any IPv6 address in your /64 subnet.

1 Create A and AAAA records for your mail hostname (e.g., mail.yourdomain.com) pointing to your Netcup server's IPv4 and ::1 IPv6 address.
2 In Netcup SCP → 'Network' → 'Reverse DNS', set the PTR record for both your IPv4 and IPv6 ::1 address to exactly 'mail.yourdomain.com'.
3 Run the script below to verify PTR propagation, install Mailcow Dockerized, and configure SPF, DKIM (2048-bit), and DMARC records.
4. Mailcow Email & rDNS (PTR)
# 1. Verify your Netcup IPv4 & IPv6 Reverse DNS (PTR) matches your HELO hostname
IPV4=$(curl -4 -s https://icanhazip.com)
IPV6=$(curl -6 -s https://icanhazip.com)
echo "IPv4 ($IPV4) PTR -> $(dig +short -x "$IPV4")"
echo "IPv6 ($IPV6) PTR -> $(dig +short -x "$IPV6")"

# 2. Install Mailcow Dockerized on Netcup RS 1000 G12.5 (8GB DDR5 ECC RAM)
umask 0022
cd /opt
git clone https://github.com/mailcow/mailcow-dockerized
cd mailcow-dockerized
./generate_config.sh
# Set MAILCOW_HOSTNAME=mail.yourdomain.com & TZ=UTC
docker compose pull
docker compose up -d
NETWORK PERFORMANCE • 2.5 GBPS WAN

Optimize Linux Kernel 6.8 TCP BBR & Socket Buffers for Netcup's 2.5 Gbps Port

Default Linux TCP buffer limits (rmem_max / wmem_max) are sized for 100 Mbps LAN links and bottleneck single-stream throughput over transatlantic (80 ms) or Europe-to-Asia (160 ms) paths. Applying fq + BBR congestion control and 32 MB TCP buffers unlocks full multi-gigabit speed on Netcup G12.5.

1 Ensure your instance runs Kernel 6.8+ (default on Ubuntu 24.04 LTS and Debian 12 Backports).
2 Write the sysctl tuning profile to /etc/sysctl.d/99-netcup-2.5g-bbr.conf.
3 Reload sysctl parameters immediately without rebooting via 'sudo sysctl --system'.
5. Kernel 6.8 TCP BBR & 2.5G Tuning
# /etc/sysctl.d/99-netcup-2.5g-bbr.conf
# Optimized for Netcup G12.5 2.5 Gbps NIC & High-BDP International Links
cat << 'EOF' | sudo tee /etc/sysctl.d/99-netcup-2.5g-bbr.conf
net.core.default_qdisc = fq
net.ipv4.tcp_congestion_control = bbr
net.core.rmem_max = 33554432
net.core.wmem_max = 33554432
net.ipv4.tcp_rmem = 4096 87380 33554432
net.ipv4.tcp_wmem = 4096 65536 33554432
net.ipv4.tcp_fastopen = 3
net.ipv4.tcp_mtu_probing = 1
net.ipv4.tcp_slow_start_after_idle = 0
net.core.netdev_max_backlog = 16384
EOF

sudo sysctl --system
sysctl net.ipv4.tcp_congestion_control net.core.default_qdisc
DEEP-DIVE ENGINEERING GUIDES & TOOLS

Explore Dedicated Netcup Benchmarks, DevOps Blueprints & Tax Tools

Each specialized engineering guide has its own dedicated page with full terminal logs, copy-paste configurations, and structured tables.

✓ Copied!